

This is a walk through of installing Jira 8.1 on on a Ubuntu 18.04 LTS minimised server. The Atlassian website has instructions for installing Jira on Linux or other operating systems but there are so many references to other pages or other sites that I wanted to have everything in one place for one type of set-up.
As I have previously set up a Ubuntu server on the Google Cloud Platform that I’m not using, I will use that. So, if you are starting from scratch and want to follow along see my previous article “Get a free Linux server with Google Cloud Platform“. You should note that the Amazon Web Serivces (AWS) “free server for a year”, does not have enough memory to run Jira, so you’ll have to pay for one. I currently run Jira and Confluence at AWS on an Ubuntu server with 2 CPUs, 8Gb RAM and 30Gb disk space.
Downloading Jira
The first thing to do is download the latest version. I will be using a free 30-day trial of Jira, but for $10 you can have a 10 user version with a year of updates and support. Jira comes in three editions and they can all coexist on the same server or can be on separate servers and can interconnect. Likewise, other Atlassian products can be installed on the same server.
Jira Software is really for agile project management for software development teams. You can manage other types of projects with it, but it uses software development terminology. Jira Core is for more traditional project management, whether for software development or anything else. Jira Service Desk works differently from Core or Software. These are both licenses per user of the application. Service Desk is intended for customers to raise tickets and for those tickets to be worked on and responded to directly with the customer. A call centre might use this. The licensing works differently, so you are paying for your call centre operatives and not the customer accounts. A lot of companies have Jira embedded in their online applications and the use of it is wide ranging.
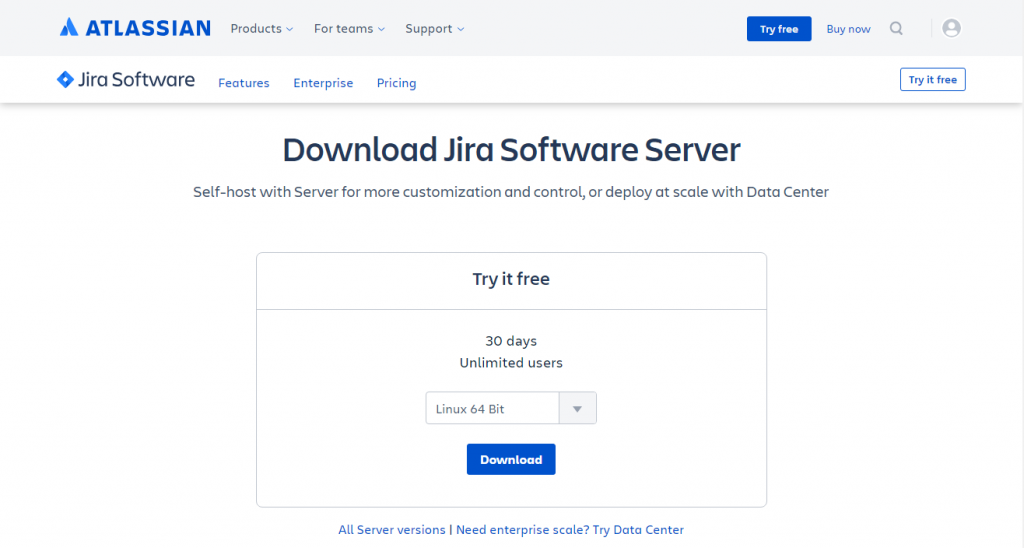
For the purpose of this article, I’ll use Jira Software and I am installing on to a Ubuntu Linux server with MySQL. In the future, I’ll write again about adding more products to the same server instance. So if you are following along, download Jira Software from here “Jira Software Free Trial Download“. Switch the selection to Linux 64 and click Download to save somewhere.
That download gives you the binary file and will install more-or-less everything you need. You don’t need Apache to already be installed but you will need a database; Oracle, SQL Server, PostgreSQL or MySQL. For simplicity, I’ll use MySQL on the same server.
Firewall Ports
Before we get to that, we need to open some ports on the firewall on the Google Cloud Platform (GCP) or on your hosting provider if choosing another option. You might think that opening a port directly on the server would do the trick but it won’t. If using AWS or GCP, a separate firewall exists between your server instance and the outside world. So, login to your GCP console and follow these steps.
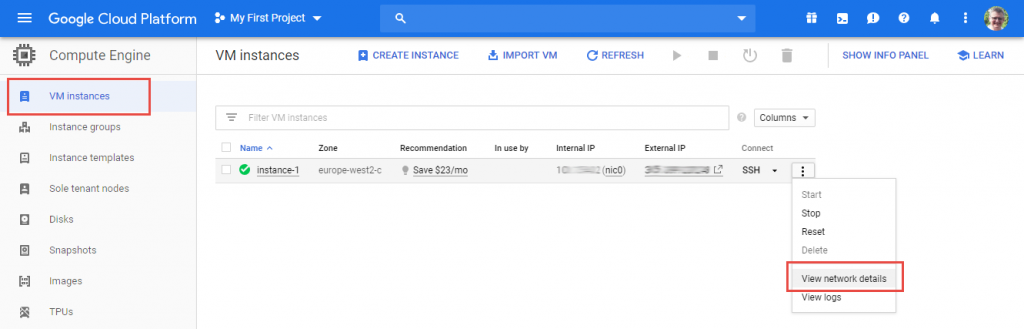
From the Compute Engine, select “VM instances” in the left panel. Then select the 3 dots menu of the instance and choose “View Network Details”.
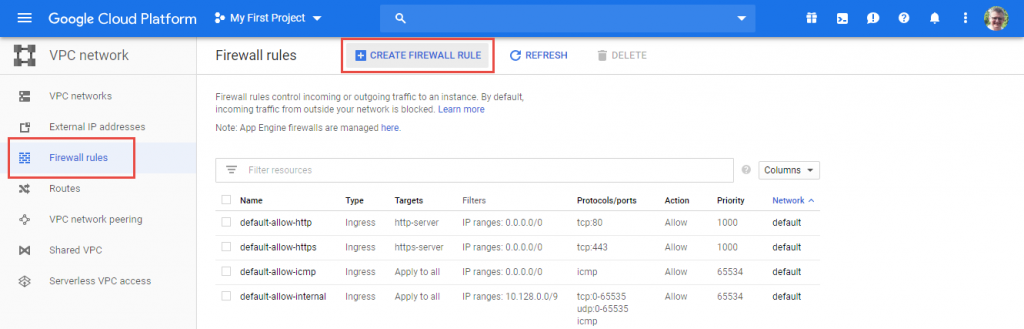
From the VPN network, select “Firewall rules” in the left panel. Then select “Create Firewall Rule” at the top of the page.
For Jira to work, we need to open both ports 8080 and 8005. Note: if you are not hosting websites, there is no need to have ports 80 and 443 open. I’m keeping those here as I want to use this server for another article using those.
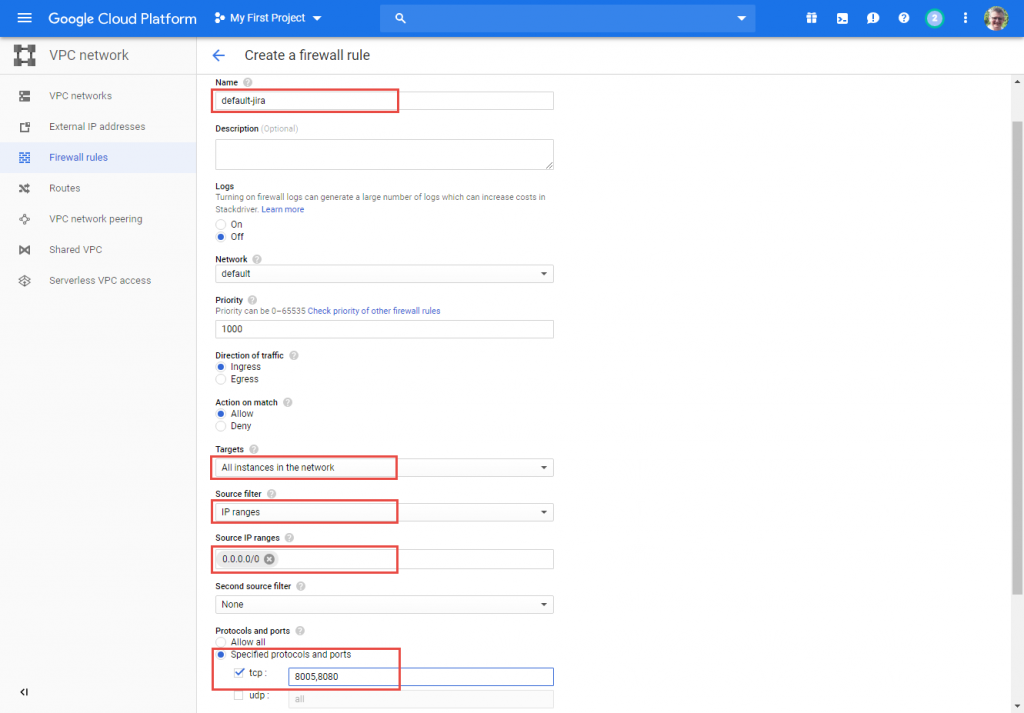
To open a port, fill in the details and click the Create button. You can accept the default except where specified below.
Name: “default-jira”
Targets: “All instances in the network”
Source filter: “IP ranges”
Source IP ranges: “0.0.0.0/0”
Protocols and ports: “Specified protocols and ports”, “tcp”, “8005,8080”
You can limit the IP range to a server’s IP address if you want.
Alternative Firewall Options
You can create a server tag and limit this new firewall rule to that tag, remembering to add the tag to the server instance.
Or, you could limit it to a service account by adjusting it.
Source filter: “Service account”
Service account scope: “In this project”, “Compute Engine default service account” (or the account you want to use if you have more than one).
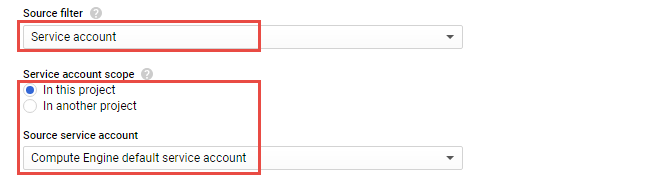
After clicking “Create” at the bottom of the page the new ports will be opened.

Java MySQL Connector Download
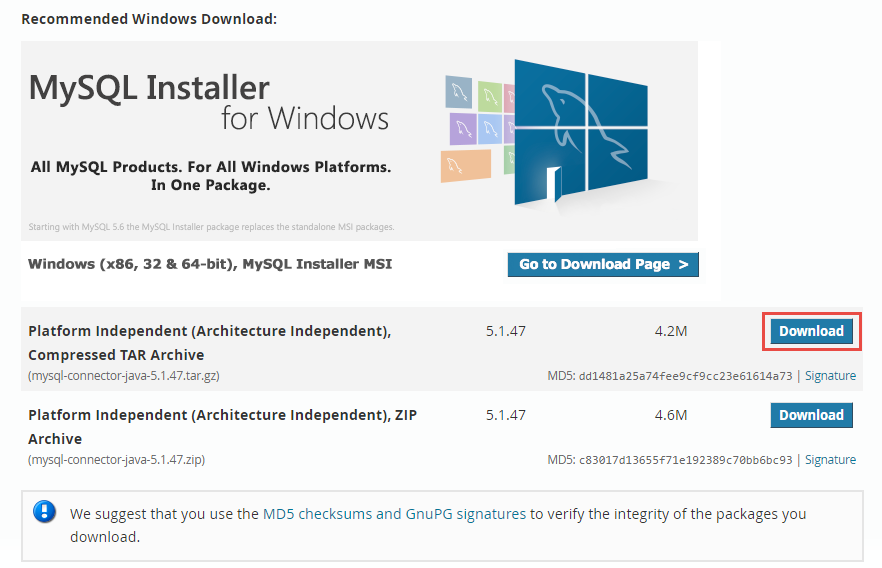
In this example, we will be using MySQL on Linux so we will also need to download the “Java Connector archive“. Select the TAR Download button and on the next page either sign-in/sign-up or click the “No thanks, just start my download” link.
Domain Name (optional)
The final bit of preparation is to associate a domain name with the IP address of the server. This is an optional step. You point a domain name to the IP address of the server and use the port number 8080 to connect (when Jira is set-up) or you can use a sub domain such as “jira”. Here I’ve set the whole domain name to my servers public IP address as I want to use it for other articles using this GCP server.

Of course, this is optional and you can still follow this example without a domain name by referencing your server directly using its IP address.
Installing MySQL
Now we need to start installing and setting up the server before we install Jira.
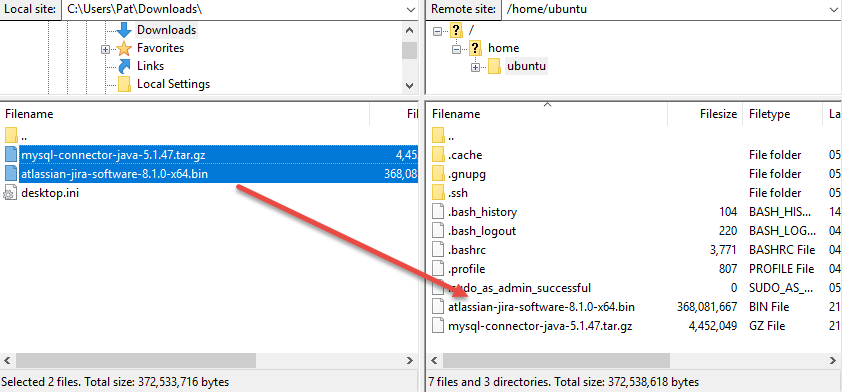
Using an FTP connection copy the Jira BIN file and the Java Connector TAR file to your home directory on the server.
Logon to your server using PuTTY or other Command Line Interface (CLI). Run any updates/upgrades that are needed before continuing.
We will need to install MySQL if you don’t already have it (if you do have it skip to the next section). Apache is not a prerequisite of installing Jira so even though I do want to use Apache in future articles, I’ll not cover that here. However, as this is a minimised Ubuntu installation, I will need to install “nano” to edit configurations files.
sudo apt install nano

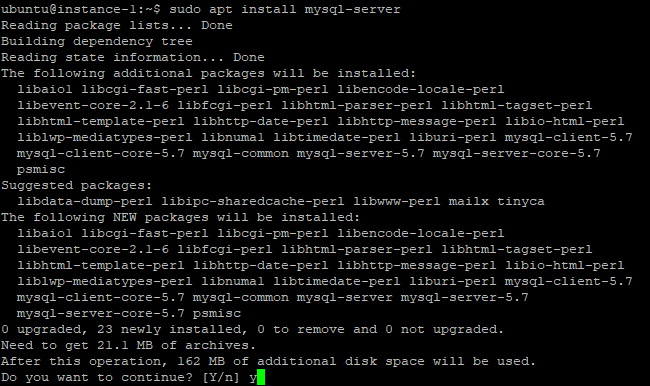
First, MySQL needs to be installed and a database created for Jira.
sudo apt install mysql-server
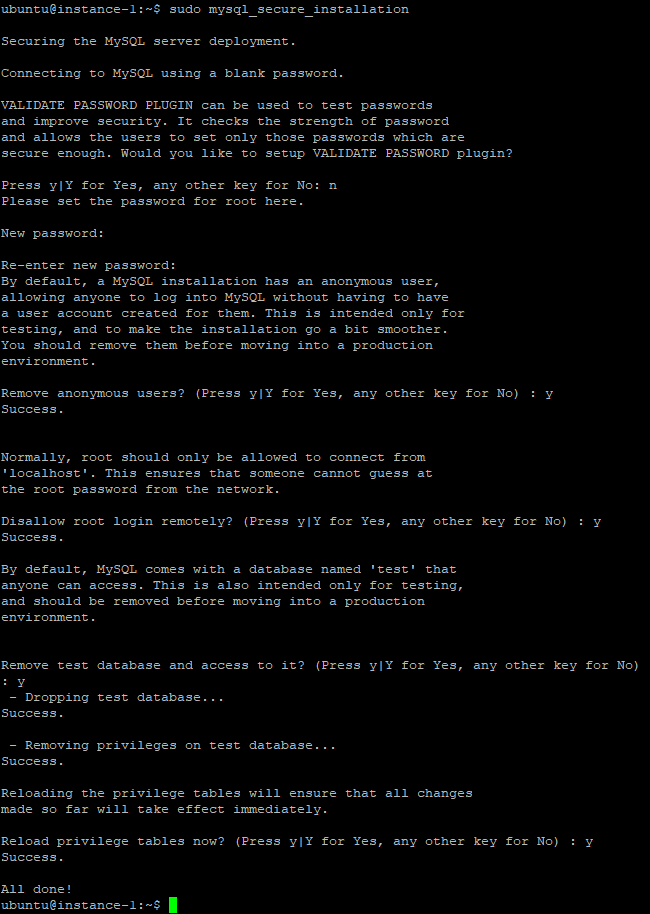
Next up we need to secure MySQL.
sudo mysql_secure_installation
At the prompts “n” for the validate password plugin. Then enter the root password when prompted. Make sure you remove anonymous access, disallow remote login, remove the test database and reset privileges by answering “y” when prompted.
Configuring MySQL and creating the Jira database
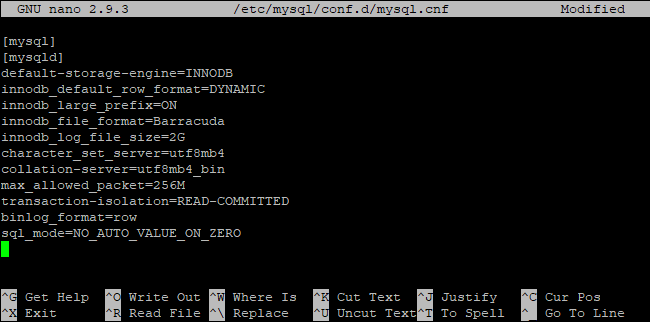
Next we need to edit the MySQL config file.
sudo nano /etc/mysql/conf.d/mysql.cnf

Add or edit the following “mysqld” section to the file and then save (Ctrl+O) and exit (Ctrl+X). This actually prepares the MySQL server for both Jira and Confluence although when installing Confluence use utf8 rather uft8mb4. Be careful with your underscores and dashes.
[mysqld]
default-storage-engine=INNODB
innodb_default_row_format=DYNAMIC
innodb_large_prefix=ON
innodb_file_format=Barracuda
innodb_log_file_size=2G
character_set_server=utf8mb4
collation-server=utf8mb4_bin
max_allowed_packet=256M
transaction-isolation=READ-COMMITTED
binlog_format=row
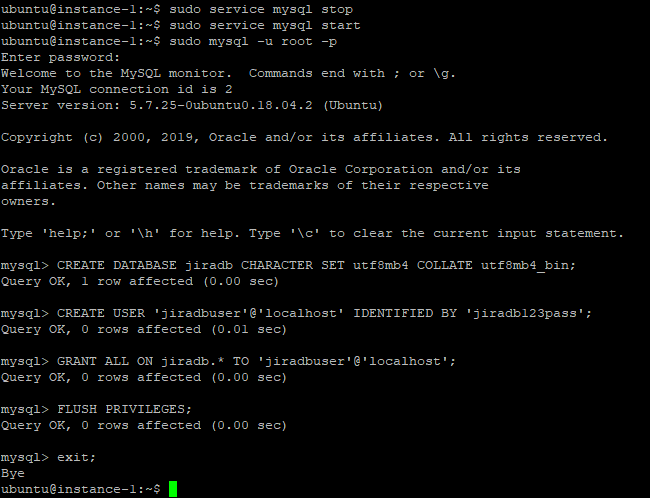
Next up you need to stop and start my SQL and log in to MySQL as “root” with the password created earlier.
sudo service mysql stop
sudo service mysql start
sudo mysql -u root -p
The steps are, create a database, create a user, grant the user permissions in the database and refresh the privileges settings. The commands are shown below but the name of the database, name of the user and the password can all be changed.
CREATE DATABASE jiradb CHARACTER SET utf8mb4 COLLATE utf8mb4_bin;
CREATE USER ‘jiradbuser’@’localhost’ IDENTIFIED BY ‘jiradb123pass’;
GRANT ALL ON jiradb.* TO ‘jiradbuser’@’localhost’;
FLUSH PRIVILEGES;
exit;
Installing Jira
You can install Jira as a service to always start when the server starts so you don’t have to remember to start it or as a service that you can manually start. If you want to install Jira as an always running auto-starting service then you will need to run Jira and install it using a separate account. If so, see the Jira as a service notes at the end of this article before continuing. If you want to have a service that you start and stop manually, carry on below.
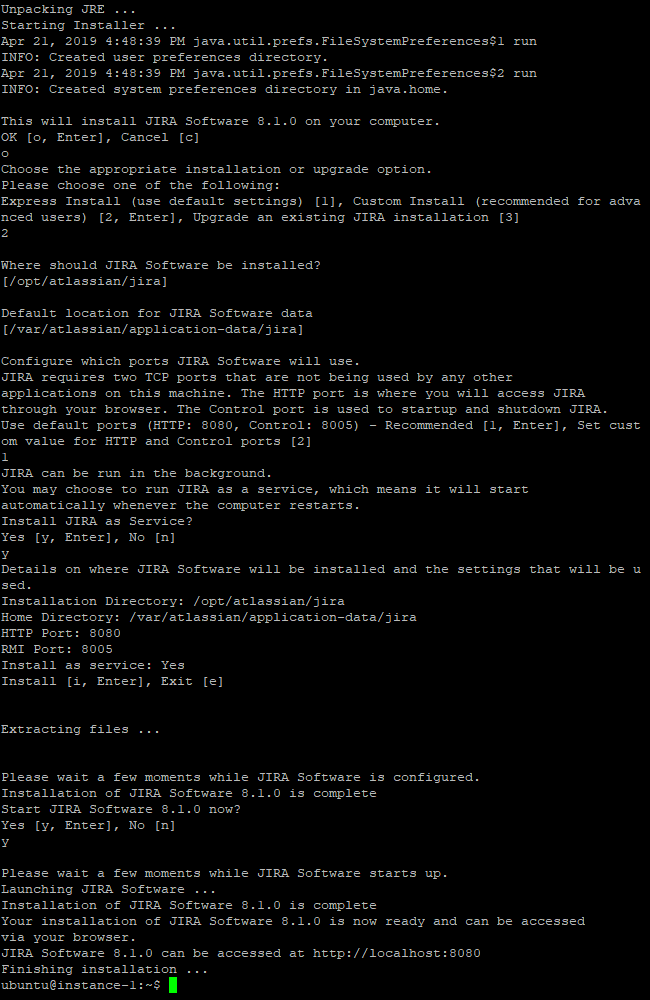
The Jira BIN file installation will also install Java and Apache Tomcat. The first thing to do make the BIN file executable and then launch the installer.
sudo chmod u+x atlassian-jira-software-8.1.0-x64.bin
sudo ./atlassian-jira-software-8.1.0-x64.bin


Answer “o” to install on this server, “2” for custom install, press enter twice when prompted for a directory to accept the defaults. Then “1” for the default ports and “y” to run Jira as service (this will not install as a service but it will create a “jira” user account to run this under so that it’s not running as “root”).
Wait a few minutes for the install to complete and then select “y” to start Jira now. It will need restarting after the Java MySQL connector is in place but starting it now will show if there are any issues.
The next step is to copy the Java MySQL connector over to the Jira library. Unpack the archive first and then copy the two relevant files over. Then reboot.
tar xvzf mysql-connector-java-5.1.47.tar.gz
sudo cp ./mysql-connector-java-5.1.47/my* /opt/atlassian/jira/lib/
sudo reboot


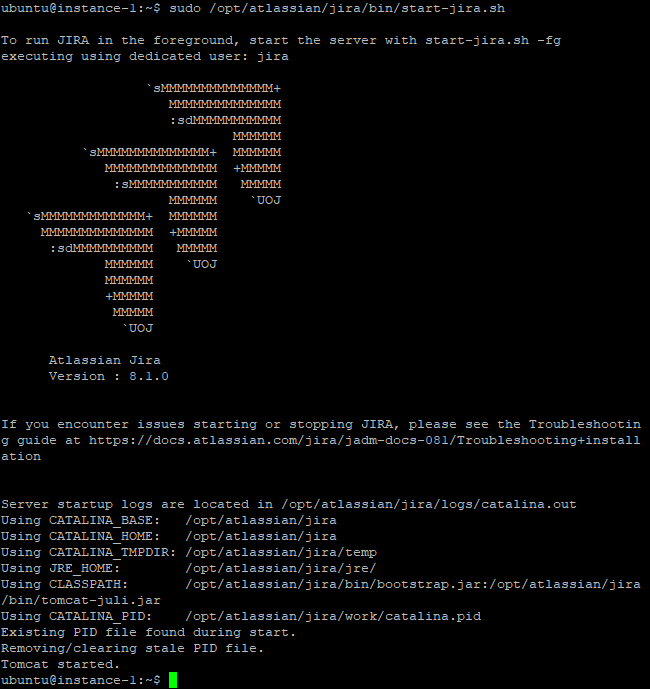
Starting Jira
Wait a bit for the server to restart.
Unless you set Jira to run as a service automatically, you will need to start it.
Using PuTTY or another command line interface start the service manually.
sudo /opt/atlassian/jira/bin/start-jira.sh
Likewise, if you need to, you can stop the service manually.
sudo /opt/atlassian/jira/bin/stop-jira.sh

Setting-up Jira
To set up Jira you need to visit it with an internet browser. Visit port 8080 in your browser either at the IP address or using the domain name.
For example: “http://pathowe.uk:8080”.
If this doesn’t work using a domain name then your DNS might not have propagated around the internet yet. If you are eager to move on try using the IP address and port rather than the name.
For example: “http://35.35.35.35:8080”.
If you still have no luck then the Jira service probably hasn’t started or is having problems starting.
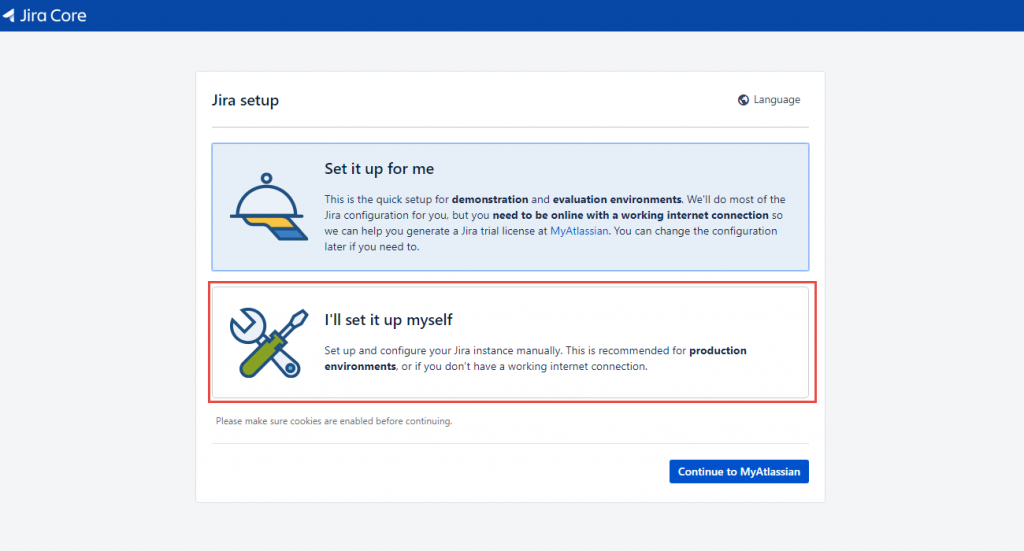
Once you get the following screen displayed in your browser, select the “I’ll set it up myself” box and click the Continue button.
Fill in your database details and “Test Connection”.
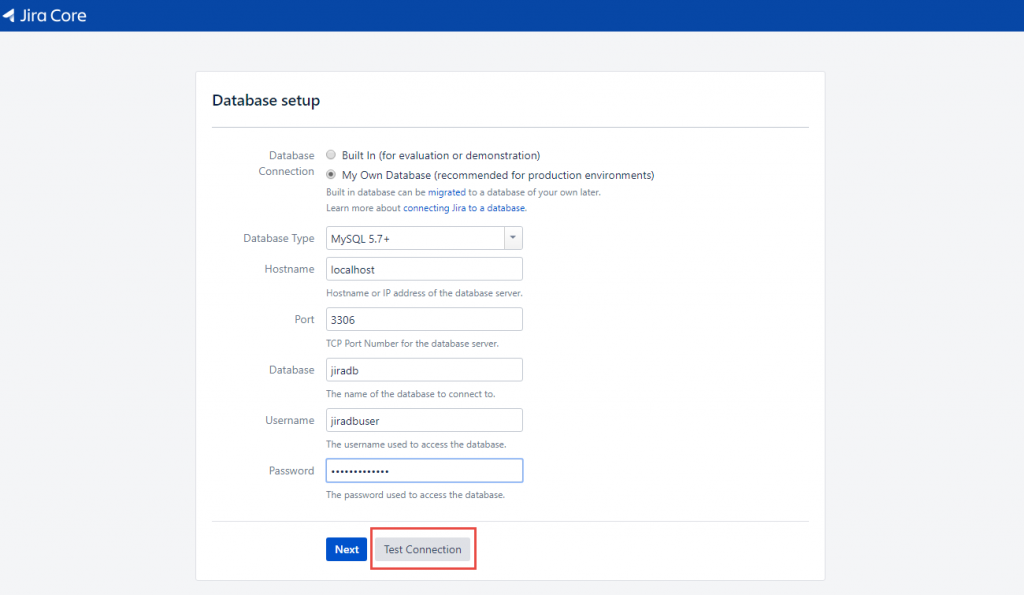
If it’s good you’ll get a success message. This part checks the settings in the MySQL config as well as the Java connector so they are the best place to start if anything is wrong.

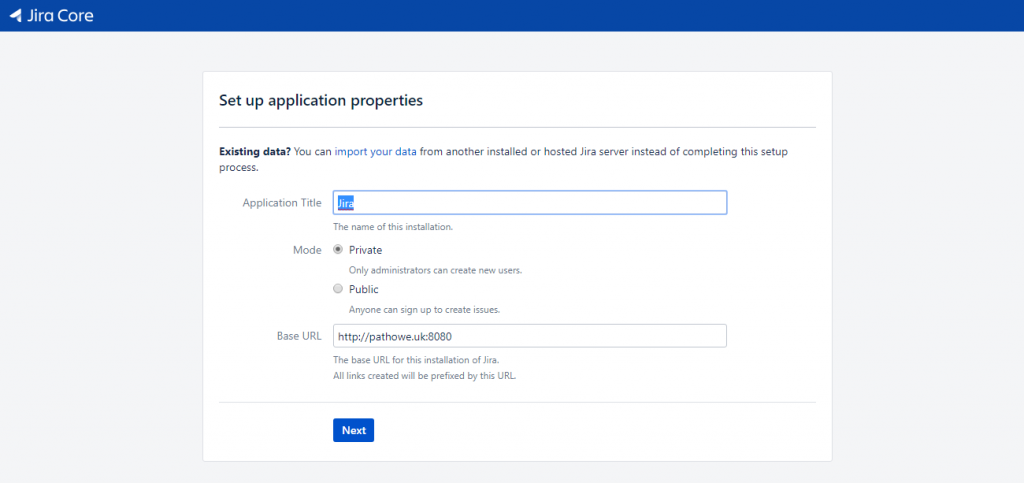
Give your application a name and confirm the URL that you want to use. Keep it private unless you intend to run Jira for a public collaboration project and even if that’s the case, I would advise you control your user accounts (after all, you’ll be paying for them).
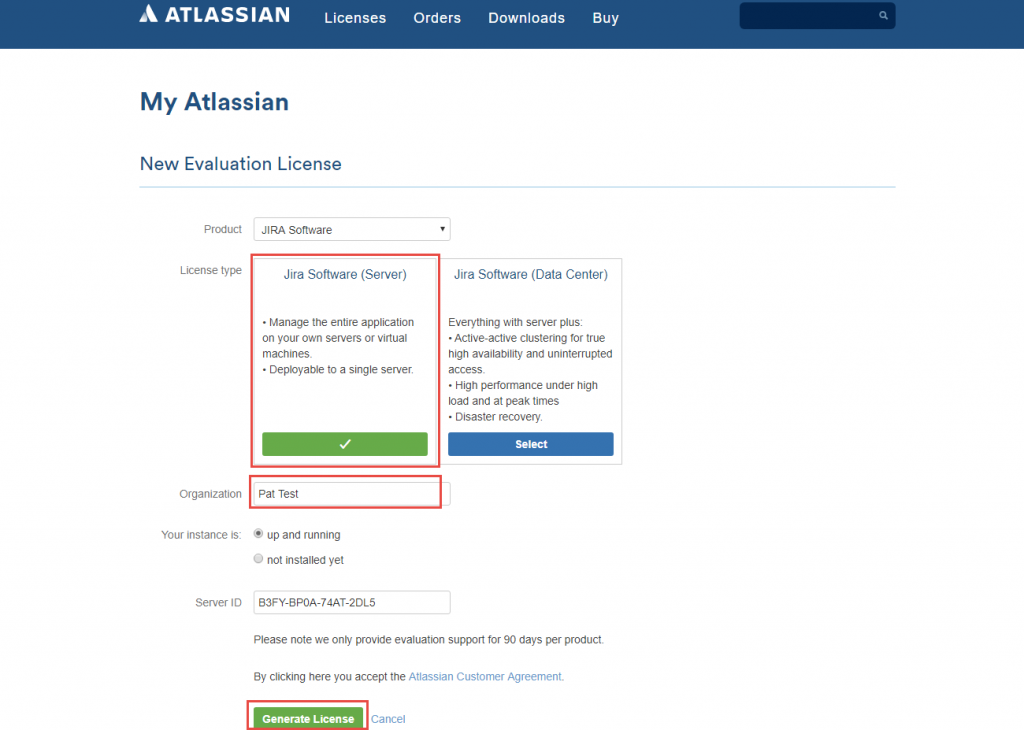
You will be prompted for your license key. You can log into your Atlassian account and buy a license or use one previously purchased or you can generate a trial license. For the purposes of this article, we’ll use a trial so click that link.
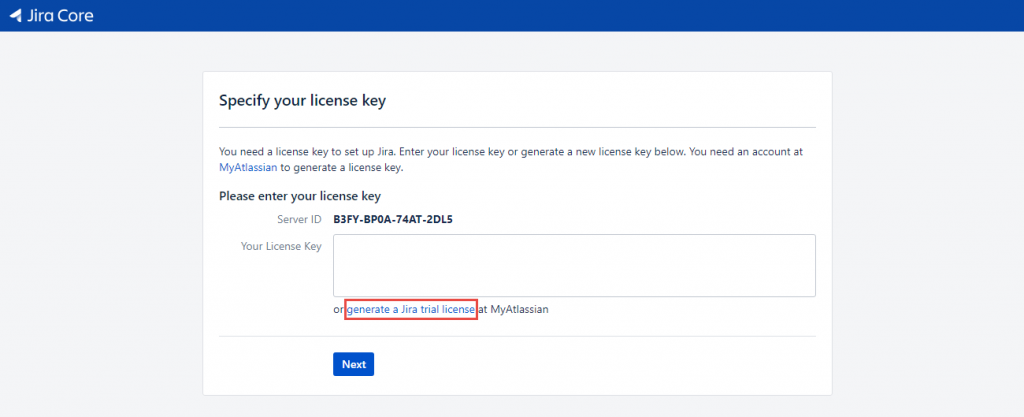
This will take you to the Atlassian website. You will need to login or create an Atlassian account and then you will be prompted for details on the New Evaluation License page (which will hopefully be auto-filled). This evaluation process works the same way as the non-evaluation process.
Next, select “Server” rather than Data Center, give it a name and Generate License.
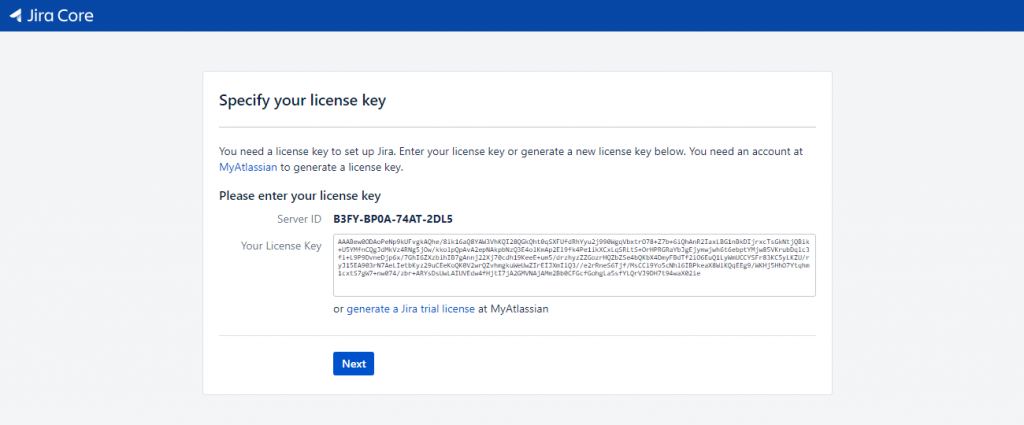
This will return to your installation with the license key in place.
If you are using a purchased version and made the purchase beforehand, then some copy and pasting will be needed. The server key pasted to the Atlassian account and the generated license pasted key back again may be required.
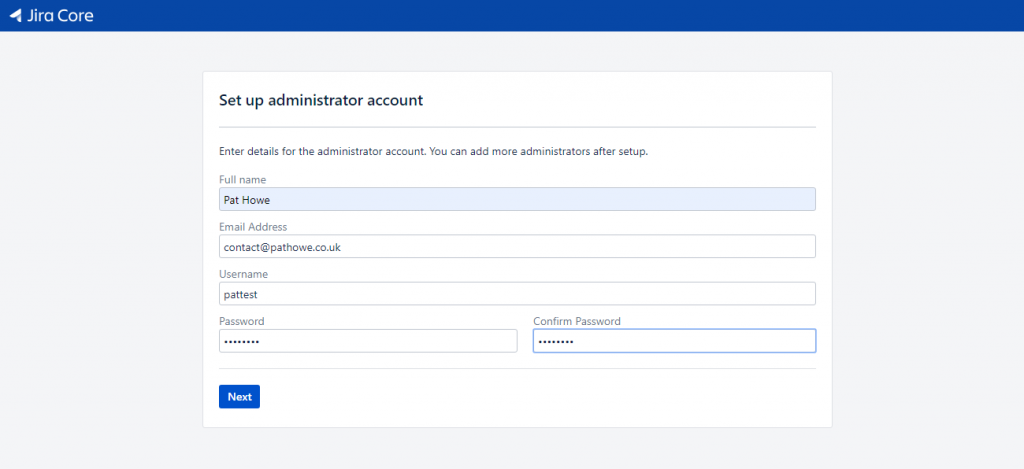
Next, enter details for your administrator account.
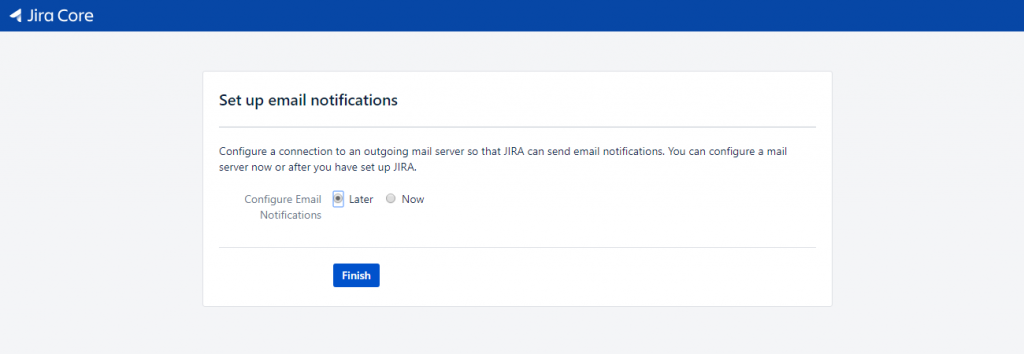
Email is not needed to run Jira, although it does help to send notifications so team members know when something is assigned to them or something they are watching has changed.
For now, select to configure email notifications later and click “Finish”. This is because I haven’t decided whether to use another service or set up email services on this server. I will come back to that at a later date.
Set your language next.

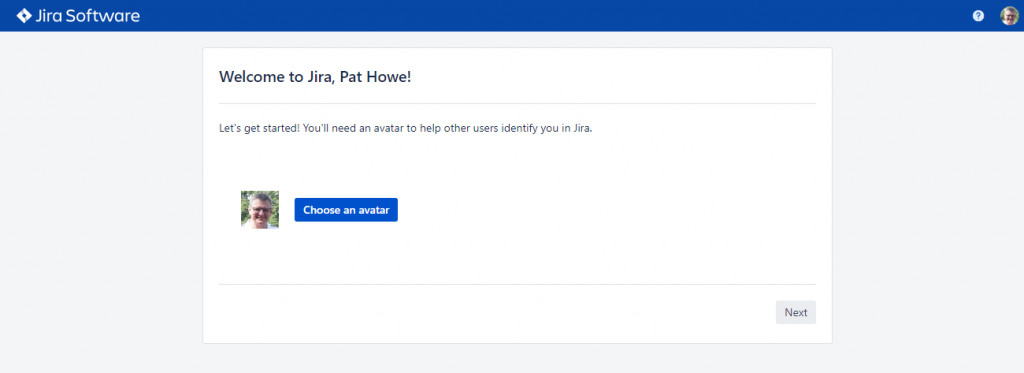
Select an avatar for your administrator account on the next page.
First Jira project
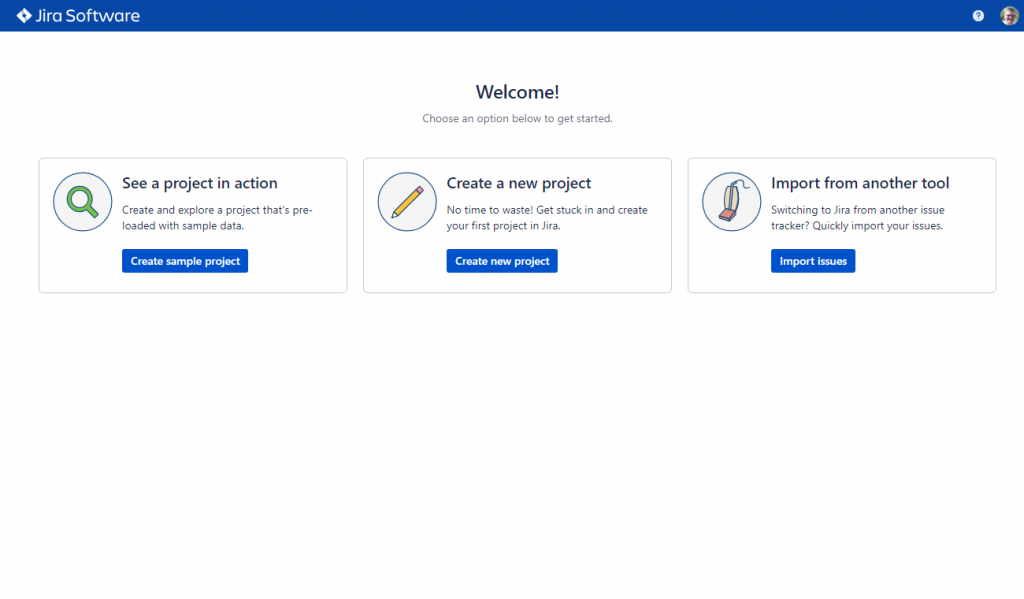
If this is not going to be a production system then a really good way to learn Jira is to “See a project in action”. You get to see quite a few of the features in a dummy project. If not, you can import a load of tasks from another tool. It doesn’t matter the column names exported from another tool as you’ll get a chance to map them if you choose that option.
If you select “Create a new project”, you’ll get to specify what type of project you want to run.
After choosing to create a new project, you will get a choice of project type. For Jira Software this gives you the basic project types as well as Kanban (burn up) and Scrum (burn down). Any time you want to create a new project, you’ll get this screen.
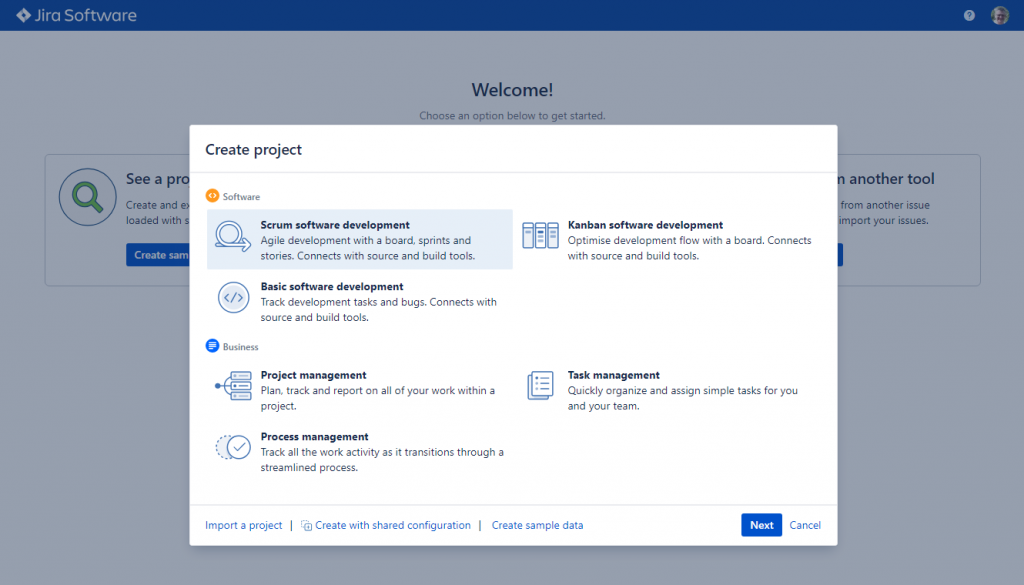
Select one to begin (I chose Scrum), kept the defaults and called it “Test Project”.
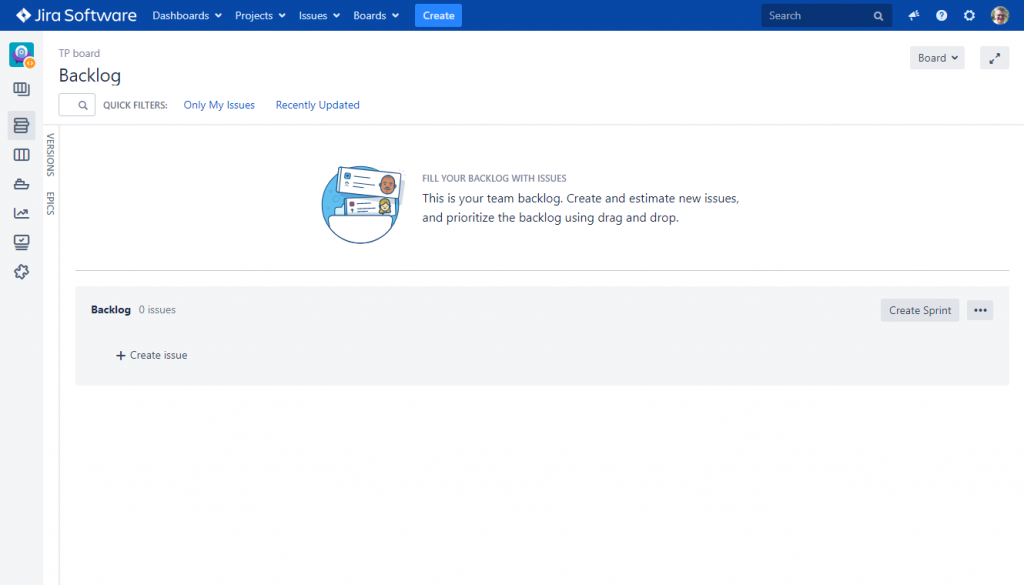
You can now start entering your user stories or you can go to the project settings to modify your workflow, user roles, etc.
That’s it for now
There will be follow up articles to this in the next month but for now, I hope this is a help to you. I know it will act as a reminder for myself the next time I need to set up Jira on Linux with MySQL.
Notes on automatically running Jira as a service
I’ve not set Jira up to run automatically in this article. However, it should be as simple and starts before the installation.
- Create a user account called “jira” to run Jira under in advance.
- Create a directory for the Jira installation.
- Make the “jira” user account the owner of this directory.
- Make sure the “jira” user account has access to the BIN file to run.
- Switch user to the “jira” user.
- Execute the BIN file.
- Follow the steps above for the Java Connector and such.
I’m not sure if you can switch from a manual start install to a auto starting service but I might investigate that in the future.
I totally agree that Jira software is completely for Agile project management, and I’m sure that both IT and non-IT teams can cope with it. Maybe the installation of Jira may not be so simple, and in this way it’s better to find an Atlassian expert who can help with installation and adjusting everything according to your team needs. You can also read some case studies, like this one: – here they describe the installation of Jira software less than in a week!