

I had a few articles in mind for this month but looks like I run out of time. This article is actually something that was rather complex but has been made very simple thanks to a WordPress plug-in.
I want to back up and restore my WordPress site to another host with a different URL. For example, if I wanted to build a site on one server and then transfer it to another. It would normally require a lot of database update queries if the URL changed. The Duplicator WP plug-in makes the transfer a simple process.
I’ve been using Duplicator for many years and so have millions of others. It’s not 100% perfect but it is a whole lot better than trying to do the job manually. So, what I’ve done in this article is moved a test site to a production site using the faster plug-in method. I’m not going to walk through the manual process as no-one needs to do this now.
I am assuming that you have a working WP Site that you want to copy to another domain and that the DNS entry for that other domain name points to the IP address of the host you are about to copy the site to.
In my example, I have a test.domainname.com already setup and have set the IP address for domainname.com and www.domainname.com pointing to the new server. Note: domainname.com is just used as an example. The screenshots in this walk through were taken from an actual move during 2019. I have hidden the domain details and altered the code examples with “test1” or other dummy details where appropriate.
Stage 1: Backing up your current WordPress site
The first thing to do is to log into your first site as the WP administrator, install the Duplicator plug in, go through the back-up process and download the two files.
To start, select Add New from Plugins.

Type “duplicator” into the Keyword box and select Install Now.

Click Activate to enable the plugin then select Duplicator from the side menu.

Create New from Packages.

Keep the default name or alter it before clicking Next.

If no errors to fix, click Build.

Click Installer to download PHP file. Click Archive to download DAF file. Click Packages to clean up the server.

Select Delete from the drop down box. Check the archive file to delete and then click Apply

You will now have your backup files saved on your local machine so you can quit the first site now.
Stage 2: Setting up the new website for hosting
Some of the steps in this section you may have already performed if you have an existing site that you are overwriting. If that’s the case ignore the majority of the steps in this section. You will of course need to upload the two files via FTP and move them to the web host location on your server so that they can be accesses publicly through a browser in the next section.
The steps here are to upload the files to the server, create a home for them and move the files to that home, create a database for the installer to use, configure and enable the website for ports 80 and 443 and install a secure certificate. Running the website securely is optional and this example follows my previous articles on setting up a Linux Ubuntu server and installing Certbot.
Using a FTP client like FileZilla copy the PHP and DAF files to the new server.

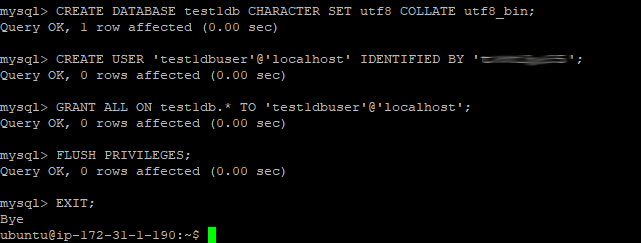
Create a directory for the website “sudo mkdir /var/www/test1”. Then move the two files to that directory “sudo mv inst* /var/www/test1/” and “sudo mv 20* /var/www/test1/”. Launch MySQL “sudo mysql -u root -p” so that you can create the database that you will need during installation.

From MySQL enter the commands to create a database and user, grant all permissions on the database to the user and refresh the privileges cache. See screenshot below for an example.
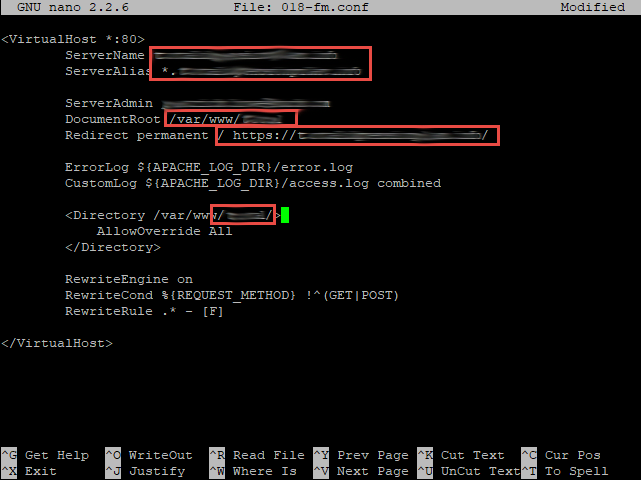
Change the directory to /etc/apache2/sites-available. Copy any previous configuration files (both for port 80 and 443) for use on the new site and then edit both files.

For port 80, change the ServerName, ServerAlias, ServerAdmin, DocumentRoot, Redirection and Directory all indicated in red.
For port 443, change the ServerName, ServerAlias, ServerAdmin, DocumentRoot and Directory all indicated in red.

Enable both configuration files and reload them into Apache.

Launch Certbot for Apache and select the numbers for the site names that you want to install a secure certificate for. The screenshot image has been truncated as there are over 30 sites on the server.

When prompted to redirect select 1 for No Redirect. This is because, we’ve already done it in out HTTP config file. Wait for the install to complete. This image has been truncated too.

Change ownership of the website directory so that the installer can run – use whatever settings you need to for your server. In my case, I have a wp-user group that I want to assign but it could easily be www-data as the owner without affecting the group settings.

Stage 3: Installing the new site
Now it’s time to run the installer. You just have to browse to the HTTPS version of the domain name and include “installer.php” as the file name. For example https://domainname.com/installer.php. That will launch the installation steps below.
You work through these and when it finishes installing, you login to the site as the WP Admin and remove the installer files (so no-one else can run the install afterwards and also to save disk space). Duplicator will do this for you automatically as long as you don’t remove that option in the final step.
To get started, accept the terms and notices and click Next.

Fill in the database details that you created for the site earlier then test that the setting are correct and click Next.

You now have the option of changing any of the setting such as the WP Admin’s username or password. By default it will use the base URL and HTTPS that you launched the installer from but you can edit those her – when you are ready click Next.

The final step installs the website, reports any issues or successes and asks you to test the site. Keep the Auto-delete box checked and click on the Admin Login button to clean up the installation files.


You should also visit the site to make sure everything looks OK by visiting the site too.
Stage 4: Optional configuration
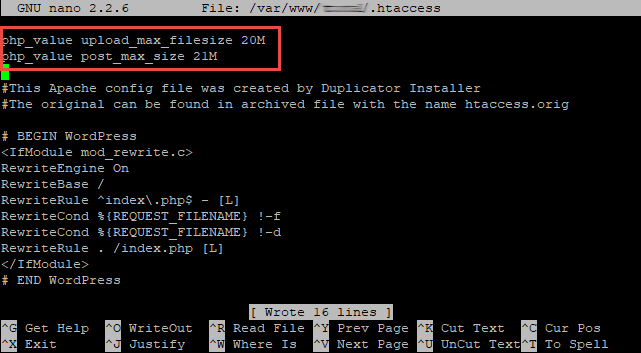
The Duplicator plugin installer creates it’s own “.htaccess” file in the root of the website and ignores any changes to this file that you might have made on the previous site.
If you didn’t alter the “.htaccess” file on the previous site, you can ignore this stage. For me, I had set the file upload limit to 20Mb so I now need to edit the file on the server to make this adjustment.
Open .htaccess in a text editor “sudo nano /var/www/test1/.htaccess”.

In my example, I am setting the maximum upload file size and the maximum post size (which needs to be a little larger) then Ctrl+O to save and Ctrl+X to quit the text editor.
Final note
That’s it, most sites should be that simple. I have had warnings on file sizes before but nothing that has stopped the installation.
Only final point to make, you should be aware that both of these sites are separate so any changes to one will not synchronise to the other.