

This is a message for My Web Minder hosting customers that are using the mailbox feature of their accounts.
A security update is taking place right now on all mail servers to help prevent non-legitimate accounts (spammers) from using these servers. It started yesterday and will continue all of the week until next weekend.
The default port for SMTP (simple mail transfer protocol), i.e. outgoing mail traffic is being switched off. Some mail clients already try a different port first but then settle for 25. A mail client is the software you use to send or receive email. If you only access your emails via Webmail then there’s no need to do anything.
The new port will be 587 and it has been available for a long time. Some may have already set up their mail client with 587 but I should imagine the majority will need to change.
The advice from the system administrator is to also switch to encrypted traffic for outbound mail. That means using “STARTTLS” rather than “None” as the encryption method. This is not enforced and is up to you. Depending on your mail client settings, “STARTTLS” may require you to install a certificate. Alternatively, to accept a certificate warning each time you want to send an email. Installation of the certificate is easy though and I’ve covered that below for Outlook too.
So here goes for the instructions for the most popular mail clients.
Outlook 2013 or earlier
- Select File
- Select Account Settings
- Select Account Settings from the dropdown
- Select your email account from the lists in the Email tab and select Change
- Select More Settings
- Select Advanced
- Change the Outgoing server (SMTP) option to 587
- Change the encryption types on both IMAP and SMTP to STARTTLS or None
- Select Ok
- Select Next
- If prompted, at the Internet Security Warning click Yes – see Internet Security Warning section below before clicking Yes
- Once tests have completed select Close and then Finish
Outlook 2016 or later (including 365)
- From Windows search for the Control Panel and open it
- Find the Mail application within the Control Panel
- Select Email Accounts
- Select your email account from the lists in the Email tab and select Change
- Select More Settings
- Select Advanced
- Change the Outgoing server (SMTP) option to 587
- Change the encryption types on both IMAP and SMTP to STARTTLS or None
- Select Ok
- Select Next
- If prompted, at the Internet Security Warning click Yes – see Internet Security Warning section before clicking Yes
- Once tests have completed select Close and then Finish
Outlook Express
- Start Outlook Express, and then select Accounts from the Tools menu at the top of the window.
- Double click on your email account.
- Under the Advanced tab, change the Outgoing server (SMTP) port 25 to 587.
Windows Mail
- Start Windows Mail, click the Tools menu at the top of the window and then click Accounts.
- Select your account under Mail, and then click on the Properties button.
- Go to the Advanced tab, under Outgoing server (SMTP), change port 25 to 587.
- Click the OK button to save the changes.
Thunderbird
- Select Tools
- Select Outgoing Server (SMTP)
- Select the server for this account then Edit
- Change the port to 587
- Change the Connection Security option to STARTTLS or None
- Change the Authentication Method option to Normal Password
- Enter your full email address as the User Name
- Select OK
- Select OK
Mac Mail, iPhone or iPad
- Select Preferences
- Select Accounts
- Select the Outgoing Mail Server (SMTP) drop down menu, then Edit SMTP Server List
- Select the SMTP server for this account
- Change the Port to 587
- Select OK
Android Mail
- Open the Email App
- Select Settings
- Select Account Settings
- Select the account you wish to change
- Scroll down to More Settings
- Select Outgoing Settings
- Change the port to 587 and the Security Settings to STARTTLS or None
- Select Done
Internet Security Warning
When you get this message.
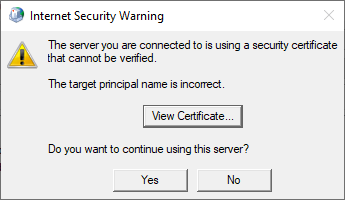
Click on View Certificate. Then Click on Install so you don’t get prompted each time. Then when you return back to this prompt after the install, click Yes.
Note that if you have several accounts then youâll probably have to install several certificates.
Further reading
If you fancy reading more, then I recently added an article about Microsoft Outlook’s hidden options here. https://pathowe.co.uk/hidden-advanced-options-in-microsoft-outlook/