

In this article I will run through the setup of multiple websites on Apache on a single Ubuntu LAMP server. LAMP is a common acronym for a typical setup and stands for Linux, Apache, MySQL and PHP. I will go through step by step using FileZilla (for transferring files) and PuTTY (command line interface for configuring the server). There are example screens walking through each step showing both enabling or disabling the default Apache website and adding/enabling other websites.
The process is the same for each additional domain so after the section on the default website, it is repeatable for all additional domains so I only go through the setup of two.
Default Apache Website
By default Apache comes with a default website enabled. If you have followed my previous examples, I have left this enabled as the default for the IP address of the server although I changed the page content.
The contents of the default website (the pages) are in the “/var/www/html” directory on an Ubuntu server. If you were setting up a single domain on this server, you could just leave it as it is and overwrite the contents here with the contents of your website and then modify the 000-default.conf file in “/etc/apache2/sites-available” to include the website domain name.
As this article is about multiple hosting on Apache, you have two choices. You can either keep a default website so that when someone enters the IP address it shows this site or you can disable it. If you disable it then when someone enters the IP address of the host, Apache will choose another of your enabled sites to display. I don’t actually know what criteria Apache uses when selecting the site to show but I’ve always found when multiple hosting that it is inappropriate. To disable the default website you enter “sudo a2dissite 000-default.conf”.

Apache also has a default HTTPS version for the default website traffic on port 443. If you want to enable the default SSL site then use “sudo a2ensite default-ssl.conf”.

By default it is usable already without additional configuration unless you want to apply a domain name and not use the default self-signed secure certificate for it. If you have a domain name attached as the default site you can setup a proper secure certificate but I will cover that in a separate article. Anyway, for now, I will keep port 443 traffic disabled. To disable this you enter “sudo a2dissite default-ssl.conf”.

To see which website configurations are available you can list them using the ls command in the /etc/apache2/sites-available directory and to see which are enabled you do the same for the /etc/apache2/sites-enabled directory. Make sure you only edit config files in sites-available.

I usually keep a default website enabled but show minimal information on it. I also give it a domain name so that the IP address is always used that way and not for one of the other websites that I might not want someone else to see.
The difference between a default website and setting up the other websites is minimal. The default website uses the “/var/www/html” folder but it can be any folder in just the same way as other websites and use any folder on the server. Traditionally these are kept in “/var/www” but if you are sharing your hosting environment then it will probably be restricted to the users home directory, maybe something like “/home/[user]/www” or “/home/[domain]/public” where [user] or [domain] would be replaced by other values. I’m the only person administering this example server so I’m going to keep all my websites together in their own separate folders under “/var/www”.
Domain Name System
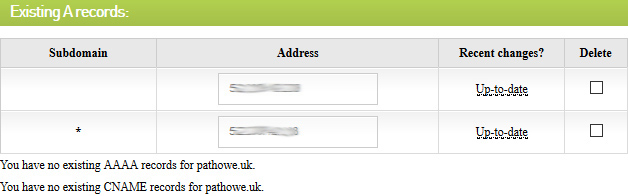
The first thing you need to do for your domain names is point them to the server’s public IP address and you do that with an A record entry. There are a minimum of two entries required. A blank subdomain for situations where no subdomain has been specified (i.e. http://mywebminder.com) and a * subdomain for situations where a subdomain has been specified (i.e. http://www.mywebminder.com or http://manage.mywebminder.co.uk).

This can take between 2 and 72 hours to propagate around the internet. In the example here, I went back in after 24 hours and everything was up-to-date. You don’t have to wait for an up-to-date all-clear message before proceeding but I would wait at least 6 hours.
Editing Default Configuration
The next thing I’m going to do is make some changes to the 000-default.conf file to support a domain name. I could disable the 000-default.conf file and create a new one but to save typing and define a template for other sites, I’ll modify this one, especially as I have a backup of it called 000-default.orig. If you haven’t already taken a backup then you can do this with the “sudo cp 000-default.conf 000-default.orig” command.

Now I’m going to edit the file using “sudo nano 000-default.conf”.

There are a lot of comments and options that make the file a bit scary. I’ve deleted everything I don’t need and kept it to a minimum. The site I’m using as my default site in this example is “buckdev.com”.
The finished file should look like this:
<VirtualHost *:80>
ServerName buckdev.com
ServerAlias *.buckdev.com
ServerAdmin contact@mywebminder.com
DocumentRoot /var/www/html
ErrorLog ${APACHE_LOG_DIR}/error.log
CustomLog ${APACHE_LOG_DIR}/access.log combined
<Directory /var/www/html>
AllowOverride All
</Directory>
RewriteEngine On
RewriteCond %{REQUEST_METHOD} !^(GET|POST)
RewriteRule .* – [F]
</VirtualHost>
I’ve left the “www” off of the servername and added a serveralias to capture all subdomains. I’ve left the documentroot, error log and customlog as it was and deleted all other lines. I’ve added a directory override to allow .htaccess files to be used as I had previous set the server to no allow overrides and used a rewrite rule to limit traffic to just GET and POST.

Ctrl+O to save and Ctrl+X to exit nano.
Next you will need to reload the apache configurations (you can restart apache too but for minimal interruption you can just reload). The command is “sudo service apache2 reload”.
Now to test this enter the domain name rather than an IP address into the browser.

Adding another website
You can set up multiple sites on the same server just by putting them in a different directory and creating and enabling another configuration file. I will add the pathowe.uk website that I started with at the beginning of this article.
First of all, navigate to the /var/www directory. Use “sudo mkdir pathowe” to create the directory to store the web files in. Change the owner to ubuntu and group to www-data and using “sudo chown -R ubuntu:www-data pathowe”.

Copy up your website using FTP or in this example I have just created a HTML file called index.html in WordPad. Here’s the code:
<!DOCTYPE html>
<html>
<head>
<title>Pat Howe</title>
</head>
<body>
<p>Welcome to the Pat Howe website demo!</p>
</body>
</html>

Then copy that file (or website) using FTP to the pathowe folder.

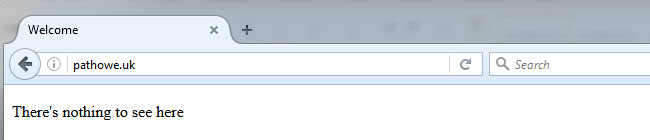
If you try navigating to the site, you will see the default for the IP address which is the contents of the html folder, which is not right.
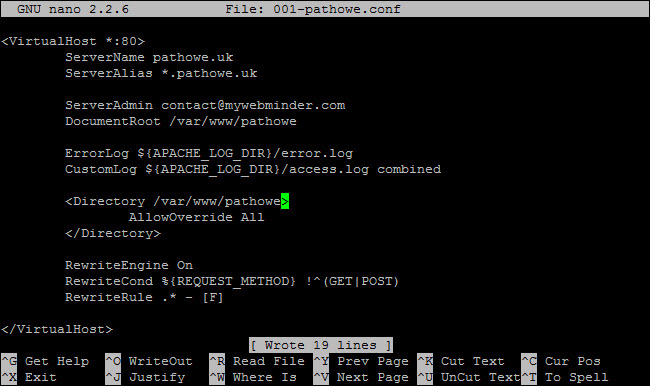
Next up we need to create the configuration file. I’ll just copy the one we used earlier in sites-available. Go to the /etc/apache2/sites-available directory and then enter the command “sudo cp 000-default.conf 001-pathowe.conf” to copy our default template and then use “sudo nano 001-pathowe.conf” to edit it.

Change servername, serveralias, documentroot and directory then save Ctrl+O and quite nano Ctrl+X.
Then we need to enable it using “sudo a2ensite 001-pathowe.conf” and reload the apache configurations using “sudo service apache2 reload”.
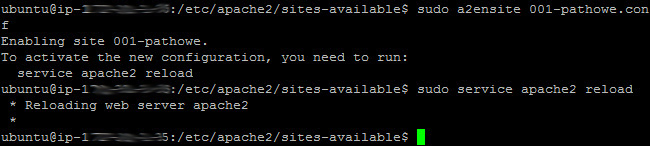
Then visit the website. If it doesn’t change then use Ctrl+F5 (or whatever your browser supports) to clear the cached version and reload the page.

More websites
Repeat these last steps for however many websites you have. I’ll write again soon about setting up port 443 traffic using a secure certificate and an option to redirect all traffic to the https version, allowing the domain to be trusted sending mail via PHP and setting up a MySQL database.
Related articles
This is part of a series of short articles covering setting up and maintaining a multiple domain web hosting environment using an Ubuntu Linux server. You can find an up-to-date list of those from the Hosting – Ubuntu category.
Nice tutorial, everything worked first time! Thanks.
I read this article. This article is very insightful. this article mentioned all the technique is very properly on the topic of Hosting multiple websites on a single Apache server. everyone should follow this steps so that they can do this properly. If anyone faces a problem which is related to Dell product they can simply take a help of Dell Customer Care to solve out the problem.