One of the features of HTML5 that interested me is the area maps that you can plot on an image. This allows you to include functionality that you would normally find within a hyperlink. Such as clicking or mouse-over to produce previously difficult to achieve effects.
This article covers the basics of HTML5 image area maps and the different type of areas that you can have within an image. It also walks through an example usage of area maps to find locations on an image map and give feedback on the web page.
What is an area map?
An image embedded within a web page will cover a rectangular area despite the actual shape of the image that is visible. An area map is a group of coordinates within that image that form a shape that can receive a user action.
The area maps in HTML5 are made up of shapes capturing all the coordinates (or pixels) within that shape. When you mouse-over or click on any of those captured coordinates, it acts in the same way that an anchor link (“a” tag) works.
How does it work?
First, there must be an image “img” on the web page and then a map “map”. The image must use a new HTML 5 tag “usemap” and the map must have a name. The map name is included in the images usemap but is prefixed with a hash “#”. For example:
<img alt=”my image” usemap=”#selector” />
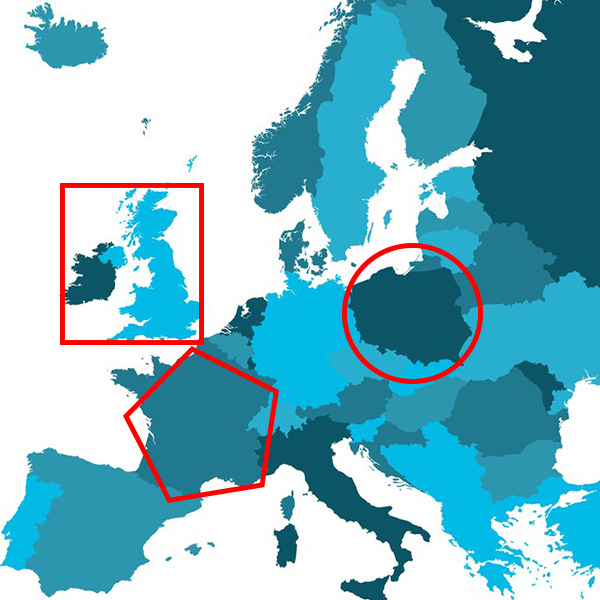
Between the open and closing map tags you include area tags. There are three types of areas; rectangle, circle or polygon. A rectangle requires an area shape of “rect” and is made up of four coordinates “coords”, top-left x, top-left y, bottom-right x and bottom-right y. A circle is shape type “circle” and requires a center x, center y and a radius. A polygon “poly” requires pairs of coordinates to plot various points on the shape. It should be noted that the last pair of coordinates will link up automatically with the starting points to form a complete shape.
To know where to start, the top-left corner of the image rectangle has coordinates 0,0. The starting from there, each pixel is one coordinate and the first number in the coordinate pair is how far from left to right across the image should it be, whilst the second coordinate is how far down from the top it should be.
Just link an anchor link, an area can have a “href” tag to link or action something. However, like images but not anchors, it must also have an “alt” tag to meet the specification and area can optionally have a “title” tag.
An image area map example
In this simple example, I have set up a page with a picture of Europe. I have then set three areas on the map that are clickable although you cannot see them. The text on the page asks you to find three countries. I’ve called the page, “Where is Denmark” but it asks you to find Iceland and Belgium too. As you click on a country a check-mark appears next to the country that you have found. I could have linked off to other pages but I just added some JavaScript to hide or show the check-mark images.

All of the code is in one HTML file and before I explain the relevant bit, here is a full listing.
<!doctype html>
<html>
<head>
<meta charset=”utf-8″>
<title>Where is Denmark?</title>
<script language=”javascript” type=”text/javascript”>
function found(e)
{
if (e == “denmark” || e == “iceland” || e == “belgium”)
{
var tag = document.getElementById(e);
tag.style.visibility = “visible”;
}
}
function init()
{
document.getElementById(“denmark”).style.visibility = “hidden”;
document.getElementById(“iceland”).style.visibility = “hidden”;
document.getElementById(“belgium”).style.visibility = “hidden”;
}
</script>
</head>
<body onLoad=”init()”>
<h1>Where is Denmark?</h1>
<h3>”Hvor er Danmark?”</h3>
<p>See if you can find and click on the following countries on the map…</p>
<table>
<tr><td><img id=”denmark” alt=”correct” src=”checked.png” /> </td><td>Denmark</td></tr>
<tr><td><img id=”iceland” alt=”correct” src=”checked.png” /> </td><td>Iceland</td></tr>
<tr><td><img id=”belgium” alt=”correct” src=”checked.png” /> </td><td>Belgium</td></tr>
</table>
<img src=”europe.jpg” alt=”Europe Map” usemap=”#europe” />
<map name=”europe”>
<area shape=”rect” coords=”310,345,375,415″ alt=”Denmark” title=”Denmark” href=”javascript:found(‘denmark’);”>
<area shape=”circle” coords=”75,138,56″ alt=”Iceland” title=”Iceland” href=”javascript:found(‘iceland’);”>
<area shape=”poly” coords=”237,482,260,505,279,517,287,492,277,478,249,476″ alt=”Belgium” title=”Belgium” href=”javascript:found(‘belgium’);”>
</map>
</body>
</html>
The first part within the page head section is the JavaScript but I’m not going to cover that here. After the initial text in the body section, there is a table containing 3 hidden check-marks (the JavaScript init function hides them on the initial page load). Beneath the table there is an image and associated map section.
Within the map section, I’ve used a rectangle area for Denmark, a circle area for Iceland and a polygon area for Belgium. This is just to show an example of using each area type. You will notice that the “coords” section of the “rect” area has 4 numbers and the “circle” has 3. However, the “poly” has many number pairs to get closer to the shape of Belgium. I’ve used the “href” tag to call a found function that just makes the appropriate check mark visible.
When you have discovered all three countries, you will have a check-mark next to each country name. The example doesn’t do any more than that.

The example image area map page can be found here, where is Denmark.
Finally, if you want to download the code and files used in the image area map example, you can do so here, image map example zip file.
