

In this article, we will use SpreadsheetGear to connect to a macro-enabled workbook that has one user-defined macro function and we will attach a class to the SpreadsheetGear object to replace that function at runtime. This is not just a feature of SpreadsheetGear as middle-wear between a website or application and a Microsoft Excel workbook will not support macros but some of them such as SpreadsheetGear will allow you some way of redefing them.
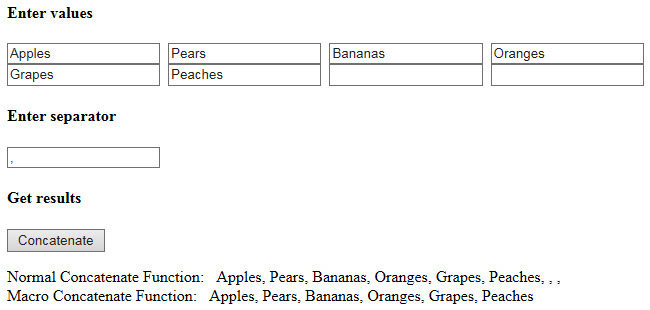
We will populate the initial page values of an ASP.NET website from a spreadsheet, make changes to those values on the website and get the results from a macro-enabled workbook. The workbook uses a custom function called ConcatRangeWithSeparator which basically takes a range of cells and combines them into a single string with each value separated by a predefined marker.
This article is part of a set on using SpreadsheetGear to include the power of Microsoft Excel behind your website. This article does not cover the basics of using SpreadsheetGear so if you are unfamiliar with using SpreadsheetGear on the web then I would suggest looking How to build Microsoft Excel powered ASP.NET websites or there are some SpreadsheetGear ASP.NET examples on their website.
The “macro-enabled” workbook
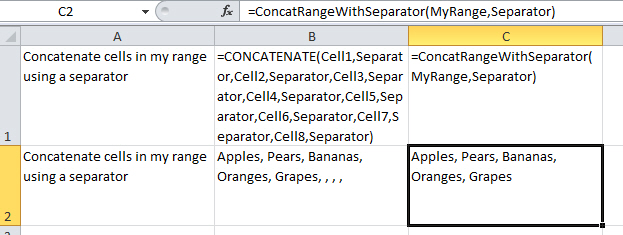
First up, let us look at the workbook we will be working with. It will concatenate a range of values using two methods; one native to Excel and one we will include as a macro function. The workbook has both input and output sheets. The input sheet has a named cell called “Separator” that we will use between each value in the range to separate them. There is a named range called “myRange” and each cell of this range has also been named “Cell1” through “Cell8”.

The outputs sheet shows two examples; one is the standard Excel function called “CONCATENATE” and the example shows how to use it to string together all of the cell values with the separate after each.
=CONCATENATE(Cell1, Separator, Cell2, Separator, Cell3, Separator, Cell4, Separator, Cell5, Separator, Cell6, Separator, Cell7, Separator, Cell8, Separator)
The result of this is that you still get the separators even if there are no values.
“Apples, Pears, Bananas, Oranges, Grapes, , , ,”
The second example uses the custom function which stops when it finds an empty cell in the range. The format for this is:
=ConcatRangeWithSeparator(MyRange, Separator)
The result of which is:
“Apples, Pears, Bananas, Oranges, Grapes”
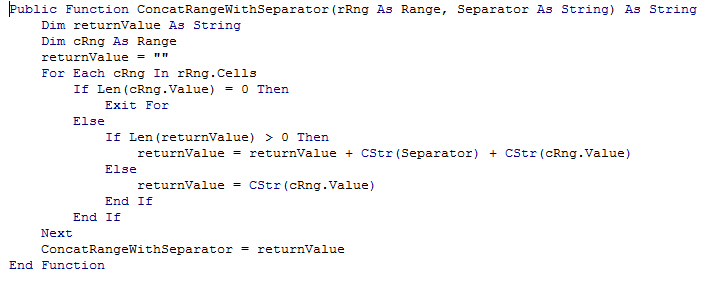
I added a module in the VBA editor (Ctrl+F11) and created a public function as follows:
Public Function ConcatRangeWithSeparator(rRng As Range, Separator As String) As String
Dim returnValue As String
Dim cRng As Range
returnValue = “”
For Each cRng In rRng.Cells
If Len(cRng.Value) = 0 Then
Exit For
Else
If Len(returnValue) > 0 Then
returnValue = returnValue + CStr(Separator) + CStr(cRng.Value)
Else
returnValue = CStr(cRng.Value)
End If
End If
Next
ConcatRangeWithSeparator = returnValue
End Function
The ASP.NET “macro-enabled” website
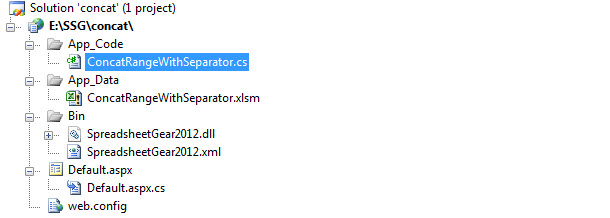
After saving as a macro-enabled workbook (.xlsm), I created a new website, added a reference to SpreadsheetGear, included the workbook in the “App_Data” folder before starting to code. I changed the authentication in “web.config” to “None”, added some text boxes, labels and a button to the page to get the layout I wanted.
<%@ Page Language=”C#” AutoEventWireup=”true” CodeFile=”Default.aspx.cs” Inherits=”_Default” %>
<!DOCTYPE html>
<html xmlns=”http://www.w3.org/1999/xhtml”>
<head id=”Head1″ runat=”server”>
<title>SpreadsheetGear Macro Demo</title>
</head>
<body>
<form id=”form1″ runat=”server”>
<div>
<h4>Enter values</h4>
<p style=”vertical-align: middle;”>
<asp:TextBox runat=”server” ID=”cell1″></asp:TextBox>
<asp:TextBox runat=”server” ID=”cell2″></asp:TextBox>
<asp:TextBox runat=”server” ID=”cell3″></asp:TextBox>
<asp:TextBox runat=”server” ID=”cell4″></asp:TextBox> <br />
<asp:TextBox runat=”server” ID=”cell5″></asp:TextBox>
<asp:TextBox runat=”server” ID=”cell6″></asp:TextBox>
<asp:TextBox runat=”server” ID=”cell7″></asp:TextBox>
<asp:TextBox runat=”server” ID=”cell8″></asp:TextBox>
</p>
<h4>Enter separator</h4>
<p style=”vertical-align: middle;”>
<asp:TextBox runat=”server” ID=”separator”></asp:TextBox>
</p>
<h4>Get results</h4>
<p style=”vertical-align: middle;”>
<asp:Button runat=”server” ID=”concatCalc” Text=”Concatenate” OnClick=”concatCalc_Click”></asp:Button>
</p>
<p style=”vertical-align: middle;”>
<asp:Label runat=”server” ID=”res1Label”>Normal Concatenate Function: </asp:Label>
<asp:Label runat=”server” ID=”result1″ Text=””></asp:Label> <br />
<asp:Label runat=”server” ID=”res2Label”>Macro Concatenate Function: </asp:Label>
<asp:Label runat=”server” ID=”result2″ Text=””></asp:Label>
</p>
</div>
</form>
</body>
</html>
Then I set about adding the code behind for the page load and the buttons’ on-click events. If the page is a post-back then I don’t need to make any modifications to it but if it is the first time it has loaded the page will not have any default values so I am going to check this and fill the page with the default values from the spreadsheet if it is appropriate.
if (!IsPostBack)
{
// Open the workbook using the current culture (don’t want any defaults)
string baseDir = System.AppDomain.CurrentDomain.BaseDirectory;
string filePath = baseDir + “App_Data\ConcatRangeWithSeparator.xlsm”;
SpreadsheetGear.IWorkbook WorkbookInterface = SpreadsheetGear.Factory.GetWorkbook(filePath, System.Globalization.CultureInfo.CurrentCulture);
// Fetch initial values from the Inputs worksheets
SpreadsheetGear.IWorksheet InputWorksheet = WorkbookInterface.Worksheets[“Inputs”];
cell1.Text = InputWorksheet.Cells[“Cell1”].Range.Text;
cell2.Text = InputWorksheet.Cells[“Cell2”].Range.Text;
cell3.Text = InputWorksheet.Cells[“Cell3”].Range.Text;
cell4.Text = InputWorksheet.Cells[“Cell4”].Range.Text;
cell5.Text = InputWorksheet.Cells[“Cell5”].Range.Text;
cell6.Text = InputWorksheet.Cells[“Cell6”].Range.Text;
cell7.Text = InputWorksheet.Cells[“Cell7”].Range.Text;
cell8.Text = InputWorksheet.Cells[“Cell8”].Range.Text;
separator.Text = InputWorksheet.Cells[“Separator”].Range.Text;
}
The SpreadsheetGear object will not understand the user-defined function so before we can return the results, we need to add a .NET equivalent of the VBA code to return the same values. This is done by adding a class to replicate the function capability. I have added a separate class to the project in the App_Code folder but you could easily just include this as a sub-class of Default.aspx.cs.
/// <summary>
/// Custom Function ConcatRangeWithSeparator to replace the one in the Macro-enabled Workbook
/// </summary>
public class ConcatRangeWithSeparator : SpreadsheetGear.CustomFunctions.Function
{
// Set to the one and only instance of this function
public static readonly ConcatRangeWithSeparator ConcatRangeWithSeparatorSingleton = new ConcatRangeWithSeparator();
public override void Evaluate(
SpreadsheetGear.CustomFunctions.IArguments arguments,
SpreadsheetGear.CustomFunctions.IValue result)
{
String retVal = “”;
String sep = arguments.GetText(1);
int rows, cols;
arguments.GetArrayDimensions(0, out rows, out cols);
for (int r = 0; r < rows; r++)
{
for (int c = 0; c < cols; c++)
{
if (!arguments.GetArrayValue(0, r, c).IsEmpty)
{
if (retVal.Length > 0)
retVal += sep + arguments.GetArrayValue(0, r, c).Text;
else
retVal = arguments.GetArrayValue(0, r, c).Text;
}
}
}
result.Text = retVal;
}
// Singleton class – so make the constructor private.
private ConcatRangeWithSeparator()
: base(
// The name of the custom function.
“ConcatRangeWithSeparator”,
// For a given set of inputs, this function always returns the same value.
SpreadsheetGear.CustomFunctions.Volatility.Invariant,
// This function returns a string.
SpreadsheetGear.CustomFunctions.ValueType.Text)
{
}
}
Everything between the curly braces of the Evaluate method is the code that does the same thing as the code in Excel. The remaining code is the wrapper. The function can produce a logical result (true/false), text or a number (a date is a number) so make sure that the ValueType returned at the end represents the right value.
Finally the code for the calculate button event including the addition of the user-defined function and then when we create the SpreadsheetGear object to represent the workbook we will add this function to that object using the WorkbookInterface.WorkbookSet.Add method.
protected void concatCalc_Click(object sender, EventArgs e)
{
// Open the workbook using the current culture (don’t want any defaults)
string baseDir = System.AppDomain.CurrentDomain.BaseDirectory;
string filePath = baseDir + “App_Data\ConcatRangeWithSeparator.xlsm”;
SpreadsheetGear.IWorkbook WorkbookInterface = SpreadsheetGear.Factory.GetWorkbook(filePath, System.Globalization.CultureInfo.CurrentCulture);
// Add the VBA function to the workbook
WorkbookInterface.WorkbookSet.Add(ConcatRangeWithSeparator.ConcatRangeWithSeparatorSingleton);
// Reference the Inputs and Outputs worksheets
SpreadsheetGear.IWorksheet InputWorksheet = WorkbookInterface.Worksheets[“Inputs”];
SpreadsheetGear.IWorksheet OutputWorksheet = WorkbookInterface.Worksheets[“Outputs”];
// Post text box values to the workbook
InputWorksheet.Cells[“Cell1”].Range.Value = cell1.Text;
InputWorksheet.Cells[“Cell2”].Range.Value = cell2.Text;
InputWorksheet.Cells[“Cell3”].Range.Value = cell3.Text;
InputWorksheet.Cells[“Cell4”].Range.Value = cell4.Text;
InputWorksheet.Cells[“Cell5”].Range.Value = cell5.Text;
InputWorksheet.Cells[“Cell6”].Range.Value = cell6.Text;
InputWorksheet.Cells[“Cell7”].Range.Value = cell7.Text;
InputWorksheet.Cells[“Cell8”].Range.Value = cell8.Text;
InputWorksheet.Cells[“Separator”].Range.Value = separator.Text;
// Get expense values
result1.Text = OutputWorksheet.Cells[“B2”].Range.Value.ToString();
result2.Text = OutputWorksheet.Cells[“C2”].Range.Value.ToString();
}
You can now run it and supply data in the eight fields and a different separator if you want. I have kept the input simple and stuck to eight fields and a fixed range in Excel but of course the code itself supports any range so you could have a data grid entry with a variable range of values rather than the static eight that I have used.
Downloads and links
You can see a working example here Concatenate Range With Separator Macro Enabled Website.
Alternatively, if you are feeling adventurous you can download the Concat Range With Separator Macro Enabled Workbook (zipped) workbook and create the website yourself following the in this article or download the website project (which includes the Workbook but excludes the SpreadsheetGear DLL) here Concatenate Macro Enabled Project (created in Visual Studio 2008 ASP.NET C# so you can upgrade to whatever version you have installed) – after you install SpreadsheetGear on your own machine you can add the reference to the website project.