Following on from my article about using names for cells or a range of cells, I have decided to continue writing about Excel and today’s subject are Excel’s use of dates and its date functions.
As I am in the UK the default way to show dates in the screenshots will be the UK format but that is just something to be aware of rather than any issue as following through with the examples on your own machine will display in default format for your location.
In this article we will cover how dates are stored, their format and then go through the current date functions. I have excluded time from this article as that is just a subset of the date functionality.
Date storage type
In Excel dates are actually stored as numbers; whole numbers representing days and the remainder being used to work out the time. The number it represents is how many days since 31st December 1899, so 1st January 1900 is 1, 2nd January 1900 is 2 and so on. On a side note, Excel actually thinks there was a 29th February 1900 when in fact there wasn’t.
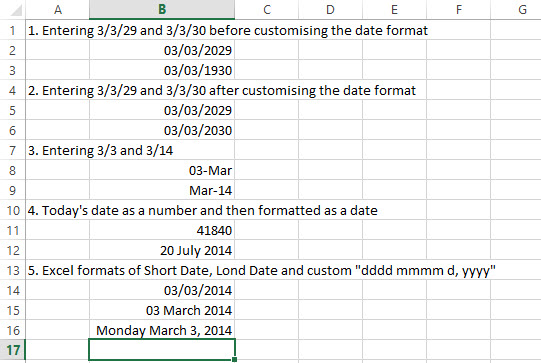
If you enter a date in an Excel cell you can use a short (two digit year) format and Excel will know what that means. The default in Excel (in all versions up to and including 2013) is to treat everything from 30 upwards as being in the twentieth century and everything up to 29 as being in the twenty-first century. Therefore, entering 3/3/29 will be treated as 3rd March 2029 and entering 3/3/30 will be treated as 3rd March 1930.
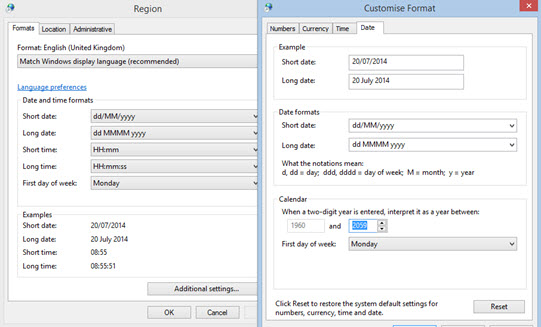
This cut off point is actually determined by the operating system so if you don’t want to accept this cut off point, you need to amend it outside of Excel. In Windows 8 you go to the Control Panel then Clock, Language and Region. From there click on Region, then on the Format tab of the resulting dialog box click on Additional settings. The Customise Format dialog box will show and you will require the Date tab and change the Calendar section where it mentions the two-digit years. In the screenshot below, I have adjusted it from 2029 to 2059. The effect is immediate so you don’t have to restart Excel to pick up customised format changes. You can also customise more than just your date format but beware every application, including Windows will use these settings.

Date formatting
Entering a date without a year part such as 3/3 will assume you mean this year so 3rd March 2014 but it will also assume that you want to display it in a short format such as 3-Mar. Entering a date without a day assumes the first of the month and will display it in a month and year format like Mar-14 for 3/14.
Excel also allows you to enter a number and have that displayed and treated as a date. Entering 41840 means the same thing to Excel as entering 20/07/2014. You can specify what Excel shows as a date format. The two basic formats Short Date and Long Date are taken directly from the operating system (Windows Region in the Control Panel). You can also specify your own custom format using the format codes below.
| Code | Example | Description |
| d | 5 or 20 | d is used to express the day without a leading zero for numbers below 10 |
| dd | 05 or 20 | dd is used to express the day with a leading zero for numbers below 10 |
| ddd | Mon | ddd is used to represent the week day in a short three letter format |
| dddd | Monday | dddd is used to represent the week day in full |
| m | 3 or 10 | m is used to express the month without a leading zero for numbers below 10 |
| mm | 03 or 10 | mm is used to express the month with a leading zero for numbers below 10 |
| mmm | Mar | mmm is used to represent the month in a short three letter format |
| mmmm | March | mmmm is used to represent the month in full |
| y | 9 or 14 | y is used to express the year without a leading zero for numbers below 10 |
| yy | 09 or 14 | yy is used to express the year with a leading zero for numbers below 10 |
| yyyy | 2009 or 2014 | yyyy is used to represent the year including the century |
You can use any text separators you like in your custom format. In the example shown below I have used a comma. The previous examples are also shown in the screenshot below.

Date functions
There are many date and time functions that you can use to manipulate dates or use dates in your formula. Rather than cover the basic functions in detail, I have prepared a table of the ones I use most often.
| Function syntax | Example formula | Example result |
| DATE(day,month,year) | =DATE(2014,7,20) | 20/07/2014 |
| DATEDIF(start_date,end_date,text_period) | =DATEDIF(DATE(2014,1,1),DATE(2014,7,20),”m”) | 6 |
| DATEVALUE(date_text) | =DATEVALUE(“20/7/14”) | 41840 |
| DAY(serial_number) | =DAY(41840) | 20 |
| DAYS(end_date,start_date) | =DAYS(DATE(2014,7,20),DATE(2014,1,1)) | 200 |
| EDATE(start_date,months) | =EDATE(DATE(2014,1,1),7) | 01/08/2014 |
| EOMONTH(start_date,months) | =EOMONTH(DATE(2014,1,1),7) | 31/08/2014 |
| MONTH(serial_number) | =MONTH(41840) | 7 |
| TODAY() | =TODAY() | 20/07/2014 |
| WEEKDAY(serial_number,return_type) | =WEEKDAY(41840,2) | 7 |
| YEAR(serial_number) | =YEAR(41840) | 2014 |
| YEARFRAC(start_date,end_date,basis) | =YEARFRAC(DATE(2014,1,1),DATE(2014,7,20),1) | 0.547945205 |
DATE is used to create a date from a given year, month and day. DATEDIF is used to determine the difference between two dates on a particular basis, e.g. “d”, “m” or “y”. DATEVALUE is used to convert a text representation of a date into a date number. DAY is used to show the day part of a date. DAYS is used to find out how many days between two dates (like DATEDIF using “d”). EDATE is used to add or subtract months from a date. EOMONTH is like EDATE but returns the last day of the resulting month. MONTH is used to show the month part of a date. TODAY returns the current date. WEEKDAY returns the day of the week based on the return type (you specify when a week should start where 1 is Sunday, 2 is Monday, etc…). In the example I’ve used 2 to start my week on a Monday so it return 7 as today is a Sunday. YEAR is used to show the year part of a date. YEARFRAC is used to show how many years and fraction of a year between two dates on a particular basis (1 identifies actual years).
Working days
There are two more date functions that I find useful and these are to do with working days. Quite often I want to know how long a project took to deliver based on the number of working days or when a project is estimated to finish based on number of work days remaining. Of course I could just say that if I know how many days there are between two dates I could divide by seven and multiply that by 5 (my staff get weekends off). However, it’s not very accurate for short turnaround times and doesn’t deal with public holidays. Excel has two functions NETWORKDAYS and WORKDAYS that can help me.

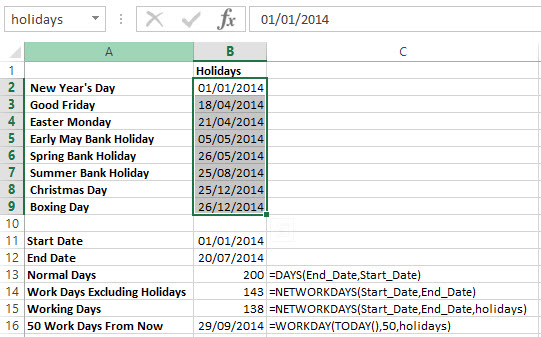
In the example shown above, I have specified a range of values and called these “holidays”. I have then specified a “Start Date” for my project start and an “End Date”. I’ve found out that there are 200 normal days between the two and then gone on to exclude weekends but not public holidays as 143 days. I could of course do something similar in a less precise way by taking 5/7 of the 200 and coming up with 142.8571429 days. However, I want to be exact and I want to include holidays so I’ve added in the holiday range to NETWORKDAYS and now get 138 actual working days to complete the project.
The other function that I want to use for determining when a project will finish based on the estimated working days of effort remaining is WORKDAYS. In this example, I estimated that there are 50 work days of effort remaining and that means that if we start today it will finish on 29th September.
Examples
I hope that this article on dates and date functions has been useful. If you want to download the example used here then click the link here Excel Dates Function Examples.

I am genuinely grateful to the holder of this web page who has shared this great piece of writing at here.